x
How to Create an EasyKAD™ Kanban Board
Step 1: Open the EasyKAD™ Kanban App in Jira
Step 2: Click the Add Kanban Board button in the right side bar.![]()
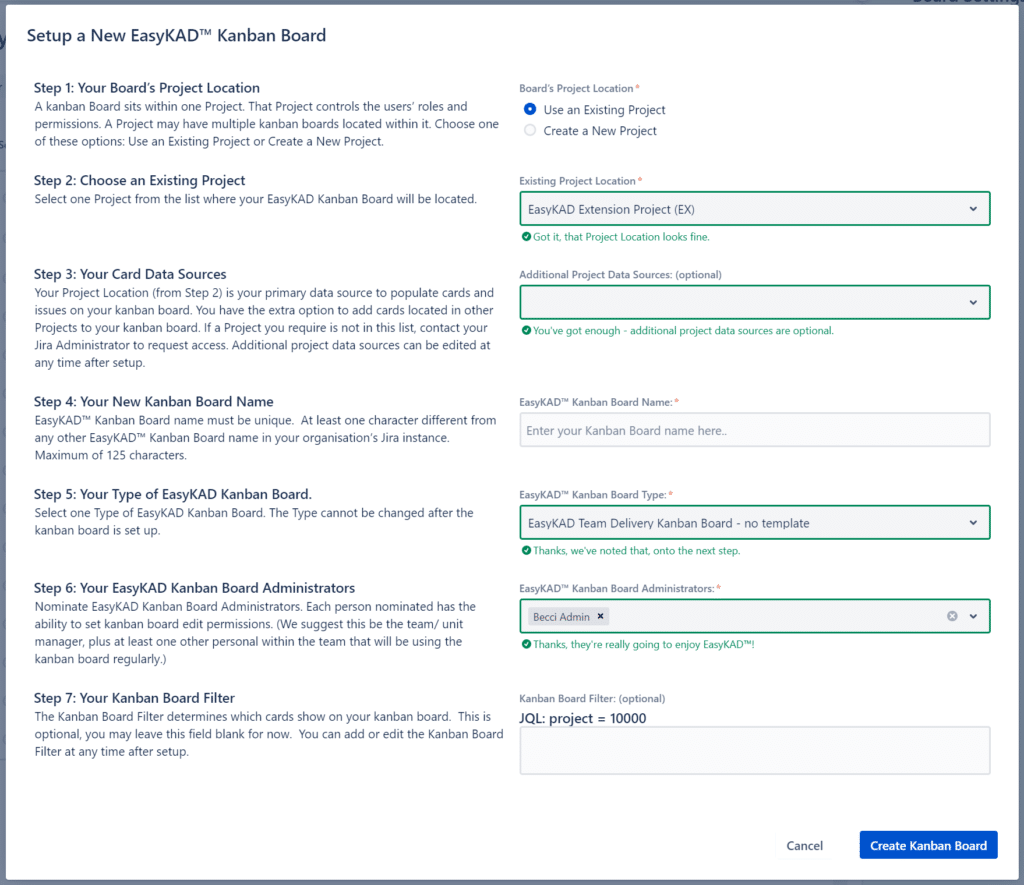
The Setup a New EasyKAD™ Kanban Board popup box will appear.

Step 3: Click a Radio Button under Board’s Project Location
An EasyKAD™ kanban board must have a home base and is located within one Jira Project.
This is a compulsory field, one of these two options must be selected:
Option A) Use an Existing Project if you intend to add a kanban board to an existing Jia Project.
If you Selected Option A, continue with Step 4 on this page.

or Option B) Create a New Project to create a new Jira Project.
If you select Option B, follow this link to another help article which has a few extra steps.
Note: If the Create a New Project option is a light grey and cannot be selected, this means your organisation’s Jira Administrator has not granted you permission to create projects. In this case, your only option at this time is to add your EasyKAD™ Kanban board to an existing project (Option A).
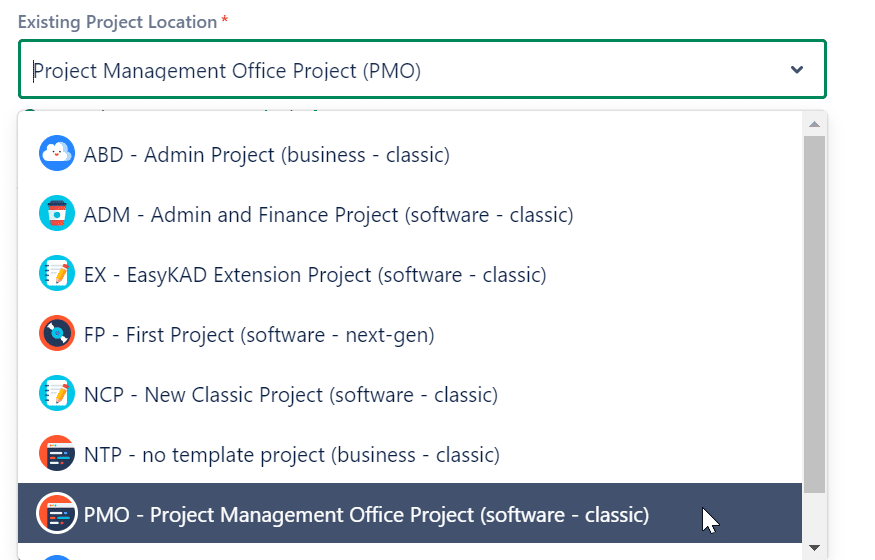
Step 4: This is a compulsory field. Click the Existing Project Location drop-down box, and select an existing Jira Project from the list.

Step 5: This field is optional. Click the Additional Project Data Sources drop-down box, to select any extra Project data sources in addition to the Kanban Board Location. This is a multi-select field, you may select none, one or many Projects.
Later you can choose to further filter the Project criteria (such as refine the Issue Types).
Additional Jira Project data sources can be edited at any time after the set up.
If your preferred project is not in the list, contact your Jira Administrator to request access.
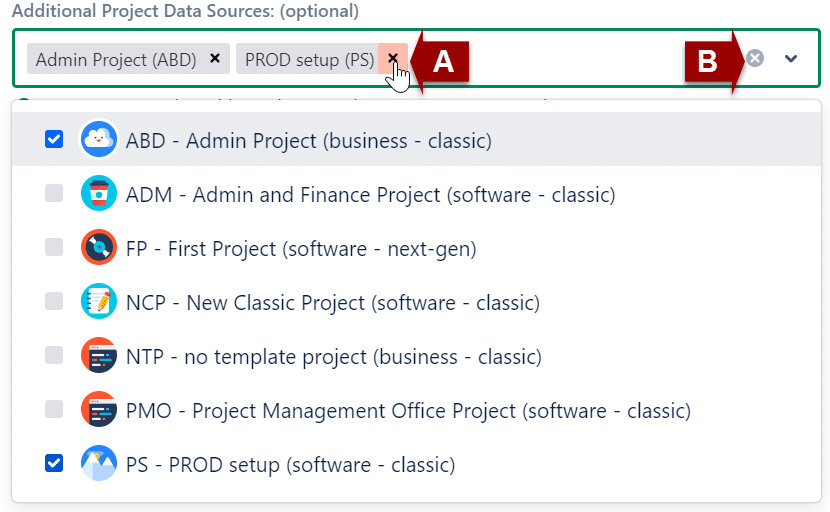
Ways to remove selected results:
A. Remove a Jira Project from the list – clicking on the “x” symbol to the right side of its name within the selection field, or uncheck the blue box; or
B. Remove all Projects – by clicking on the “x” button on the right side of the selection field.

Step 6: This field is compulsory. Inside the EasyKAD™ Kanban Board Name box, type text to give a name for the kanban board.
The EasyKAD™ Kanban Board name must be unique, that is, not identical to another Kanban Board in your site.
The EasyKAD™ Kanban Board name must not exceed 125 characters.

Step 7: This is a compulsory field. Click the EasyKAD™ Kanban Board Type drop-down box.
Presently, there is only one type of Kanban Board, the EasyKAD™ Team Delivery Kanban Board.

There are two quick start templates to choose from:
Option A) No template – this has zero customised configuration and a compulsory single column in each first level column.

Option B) Lean template – this has some customised Column names to help prepare work in Planning to be ready to enter the Work in Progress.

The choice of quick start template makes no difference to the kanban board features available after setup.
Step 8: This field is compulsory. Click the EasyKAD™ Kanban Board Administrators drop-down list and select at least one Administrator for your kanban board.
Ways to remove selected persons:
A. Remove one person from the list – clicking on the “x” symbol to the right side of its name within the selection field, or uncheck the blue box;
B.Remove all Persons – by clicking on the “x” button on the right side of the selection field.

Step 9:This field is optional. Click the Kanban Board Filter text field. Kanban Board Filters determine which cards show on your Kanban board.
If you want to show all cards/issues within the Jira Project/s, leave this field blank.
This field must use the Jira Query Language (JQL). Learn about JQL here.
This field can be edited at any time after setup.

Step 10: Click the Create Kanban Board blue button at the bottom right corner of the box.![]()
If the Create Kanban Board button is greyed out, scroll up to find an error and check all compulsory fields have a value.
